使用grunt压缩magento的js,css,图片来提高magento的访问速度
分类: Magento
Magento从当前控制器中获取另外一个控制器中的方法
首先,正常人类是不会这么操作的。当然了,特殊的情况还是会存在的。 Mage.php 文件里面 实例化类的方法 getControllerInstance
    /**
     * Retrieve Controller instance by ClassName
     *
     * @param string class
     * @param Mage_Core_Controller_Request_Httprequest
     * @param Mage_Core_Controller_Response_Http response
     * @param arrayinvokeArgs
     * @return Mage_Core_Controller_Front_Action
     */
    public static function getControllerInstance(class,request, response, arrayinvokeArgs = array())
    {
        return new class(request, response,invokeArgs);
    }
这里我们用下面代码获取控制器类的时候会报错
Fatal error: Class 'Mage_Customer_AccountController' not found

$controller = Mage::getControllerInstance('Mage_Customer_AccountController', null, null);
原因是没有加载这个Mage_Customer_AccountController类的php文件。 现在先看看路由的时候怎么加载控制器的Class 的 Mage_Core_Controller_Varien_Router_Standard
public function match(Zend_Controller_Request_Http request){
            ...controllerClassName = this->_validateControllerClassName(realModule, controller);
            if (!controllerClassName) {
                continue;
            }

        // instantiate controller class
        controllerInstance = Mage::getControllerInstance(controllerClassName, request,front->getResponse());
        ...
}
到了_validateControllerClassName()里面的 _includeControllerClass 才具体include 控制器类文件
    /**
     * Include the file containing controller class if this class is not defined yet
     *
     * @param string controllerFileName
     * @param stringcontrollerClassName
     * @return bool
     */
    protected function _includeControllerClass(controllerFileName,controllerClassName)
    {
        if (!class_exists(controllerClassName, false)) {
            if (!file_exists(controllerFileName)) {
                return false;
            }
            include controllerFileName;

        if (!class_exists(controllerClassName, false)) {
            throw Mage::exception('Mage_Core', Mage::helper('core')->__('Controller file was loaded but class does not exist'));
        }
    }
    return true;
}
到这里就很明了了。Magento从当前控制器中获取另外一个控制器中的方法就是得先include其他控制的类php文件,后面就是操作一个php类了 这种反人类的做法会不会是我想多了,本文也是为写而写了,实际应用中不建议做这种操作。有错误请帮忙指出。
Magento订单邮件发送给多个收件人的问题
Magento1.9后订单邮件是通过计划任务cron job 发送,待发的邮件都保存到了core_email_queue表里,收件人则保存到了core_email_queue_recipients这个表。 通过计划任务定时发送邮件 和清理已经发送了的邮件。清理的时候是删除了core_email_queue表里的已发送邮件,通过外键约束同时把对应的core_email_queue_recipients表里的收件人 也清理了。 然,有些情况下会碰到Magento订单邮件发送给多个收件人的问题。这个就是外键约束丢失了。
修复代码
注意:这里直接清空了这2个表,要保留未发送邮件的需要自己清理错误的收件人,再修复表即可。
SET FOREIGN_KEY_CHECKS=0;
TRUNCATE `core_email_queue`;
TRUNCATE `core_email_queue_recipients`;
#约束 同时删除,避免重复发错邮件
ALTER TABLE core_email_queue_recipients ADD FOREIGN KEY(message_id) REFERENCES core_email_queue(message_id) ON DELETE CASCADE;
SET FOREIGN_KEY_CHECKS=1;
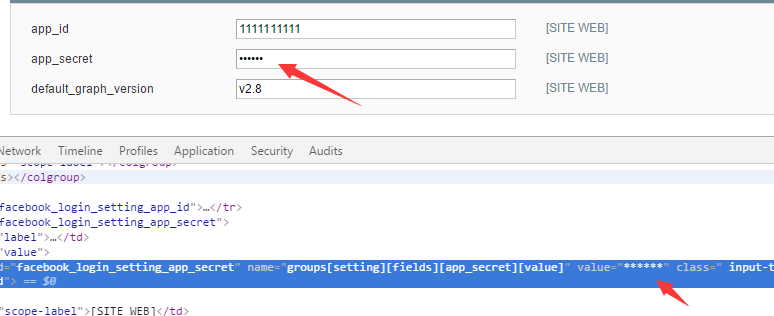
Magento后台Configuration encrypted 配置加密和解密
后台配置设置的时候有时候需要加密保存,如一些关键的账号密码就不应该明文保存到数据库和显示在前台。 配置代码如下面 后台Configuration encrypted 配置加密的代码
            <app_secret translate="label">
              <label>app_secret</label>
              <frontend_type>password</frontend_type>
              <backend_model>adminhtml/system_config_backend_encrypted</backend_model>
              <sort_order>2</sort_order>
              <show_in_default>1</show_in_default>
              <show_in_website>1</show_in_website>
              <show_in_store>0</show_in_store>
            </app_secret>
获取值得代码
appSecret = Mage::getStoreConfig('facebook_login/setting/app_secret',storeId);
直接拿getStoreConfig 获取到的值是经过加密的,还需要解密才能用。 解密代码
appSecret = Mage::helper('core')->decrypt(appSecret);
其他问题,配置文件中设置<frontend_type>password</frontend_type>的时候,前台还是能看到明文字符的。 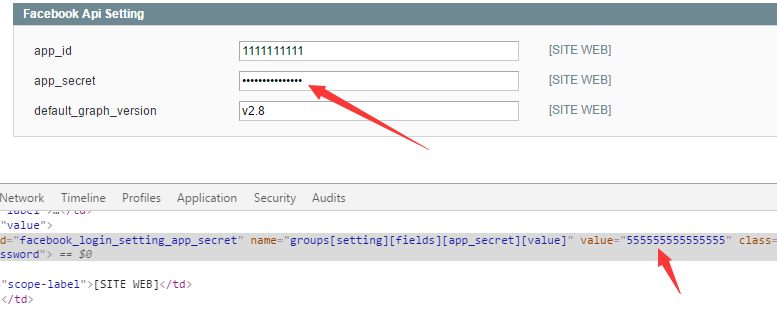 要不显示明文字符,配置文件中设置<frontend_type>obscure</frontend_type>即可。
Magento2.x中文语言包及安装使用
本站版本的 Magento2.x中文语言包 还在整理中,先把一份[作者:木瓜]的共享出来。 如果需要最新Magento1.x中文语言包请到这里 magento1.x中文语言包下载地址
下载
安装
上传到mage2.store/app/i18n/Magento/zh_Hans_CN文件夹 【备注:mage2.store/vendor/magento/language-zh_hans_cn】 运行脚本命令:
bin/magento setup:static-content:deploy zh_Hans_CN
使用
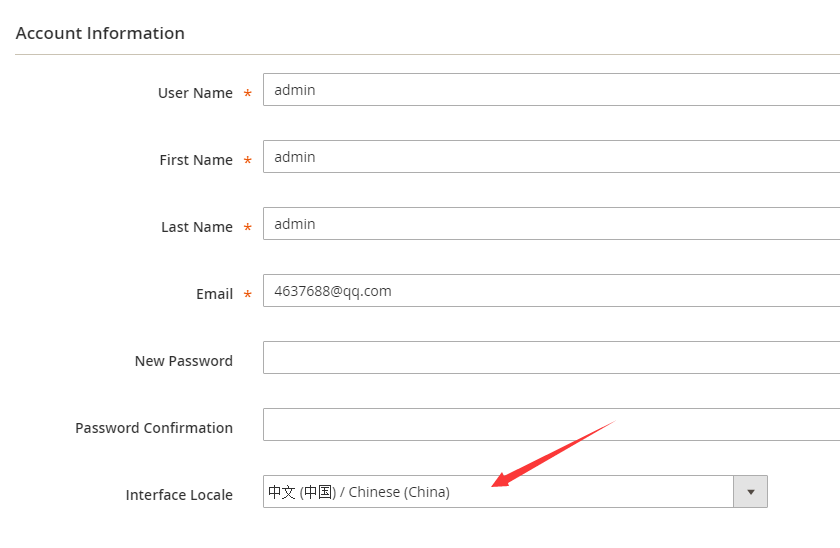
后台显示中文界面
编辑后台用户账号,把Interface Locale 设为中文。如下图: 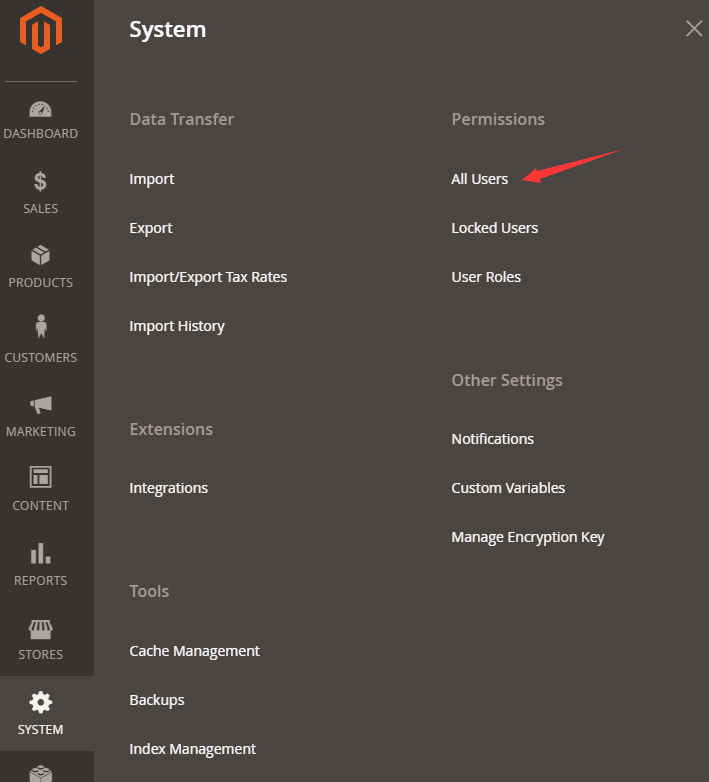
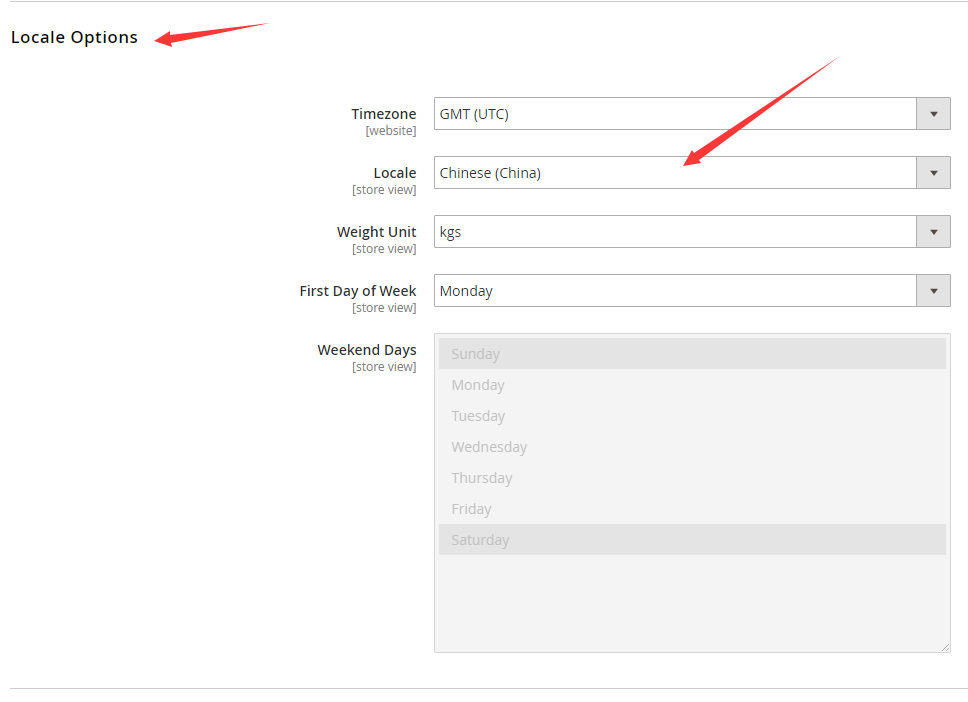
前台使用中文
修改店铺配置,把Locale Options 下面的locale 设为中文,如下图: 
Magento中文语言包
长期维护Magento中文语言包,Magento新版本发布后会及时把对应的更新放出来。
本语言包特点:
– 在目前网上流传的中文语言包的基础上,修正了很多翻译,尤其是一些完全错误的翻译。
– 语言包管理做成了Magento 的一个插件,能及时发现新增翻译字段,也方便翻译调试。
不足之处是 没有100%的翻译成中文,也不打算这么干。
Magento 1.x 中文语言包下载地址
Magento 1.9.3.2 翻译就多了一个字段,忽略不计了。
- Mage_Page.csv © 2017 Magento Demo Store. All Rights Reserved.
Magento 1.9.3.1 中文语言包无新增翻译字段
Magento 1.9.3 中文语言包
Magento1.9.3最新中文语言包-20161030
Magento 2.x 中文语言包下载地址
如果需要最新Magento1.x中文语言包请到这里 magento2.x中文语言包下载地址
Windows下Magento2安装教程
最近要开始写magento2的支付插件,需要本地环境。就安装了下magento2,也顺便把安装Magento2的过程做成教程发布出来,给需要的人看吧。 安装测试环境:windows 10, 集成环境直接用了xampp。 写教程远比写代码累,,欢迎拍砖!
根据属性值获取可配置产品configurable product下的子产品 simple
根据属性值获取可配置产品configurable product下的简单产品 simple product。 详细说明看下面代码注释。
$product = Mage::getModel('catalog/product')->load('2639');//configurable产品

$collection = Mage::getResourceModel('catalog/product_type_configurable_product_collection')
                    ->setProductFilter($product);
$collection->addAttributeToSelect('*');

$collection->addAttributeToFilter('color', 4); //color是配置选项,4 是color属性值的ID

foreach($collection as $p){
     print_r($p->getData());
}
Magento2配置redis缓存 session / page_cache
Magento2配置redis缓存,包括redis保存session, cache page_cache
session redis配置
修改文件:app/etc/env.php session的节点改成下面的
'session' =>
   array (
   'save' => 'redis',
   'redis' =>
      array (
	'host' => '127.0.0.1',
	'port' => '6379',
	'password' => '',
	'timeout' => '2.5',
	'persistent_identifier' => '',
	'database' => '0',
	'compression_threshold' => '2048',
	'compression_library' => 'gzip',
	'log_level' => '1',
	'max_concurrency' => '6',
	'break_after_frontend' => '5',
	'break_after_adminhtml' => '30',
	'first_lifetime' => '600',
	'bot_first_lifetime' => '60',
	'bot_lifetime' => '7200',
	'disable_locking' => '0',
	'min_lifetime' => '60',
	'max_lifetime' => '2592000'
    )
),
特别说明:Magento 2.0.6及后面的版本才支持 redis保存session 官网说明链接:http://devdocs.magento.com/guides/v2.0/config-guide/redis/redis-session.html
page cache redis配置
	'cache' => array(
	  'frontend' => array(
		'default' => array(
		  'backend' => 'Cm_Cache_Backend_Redis',
		  'backend_options' => array(
			'server' => '127.0.0.1',
			'port' => '6379',
			'persistent' => 'mage2', // Specify a unique string like "cache-db0" to enable persistent connections.
			'database' => '0',
			'password' => '',
			'force_standalone' => '0', // 0 for phpredis, 1 for standalone PHP
			'connect_retries' => '1', // Reduces errors due to random connection failures
			'read_timeout' => '10', // Set read timeout duration
			'automatic_cleaning_factor' => '0', // Disabled by default
			'compress_data' => '1', // 0-9 for compression level, recommended: 0 or 1
			'compress_tags' => '1', // 0-9 for compression level, recommended: 0 or 1
			'compress_threshold' => '20480', // Strings below this size will not be compressed
			'compression_lib' => 'gzip', // Supports gzip, lzf and snappy,
			'use_lua' => '0' // Lua scripts should be used for some operations
		  )
		),
		'page_cache' => array(
		  'backend' => 'Cm_Cache_Backend_Redis',
		  'backend_options' => array(
			'server' => '127.0.0.1',
			'port' => '6379',
			'persistent' => 'mage2', // Specify a unique string like "cache-db0" to enable persistent connections.
			'database' => '1', // Separate database 1 to keep FPC separately
			'password' => '',
			'force_standalone' => '0', // 0 for phpredis, 1 for standalone PHP
			'connect_retries' => '1', // Reduces errors due to random connection failures
			'lifetimelimit' => '57600', // 16 hours of lifetime for cache record
			'compress_data' => '0' // DISABLE compression for EE FPC since it already uses compression
		  )
		)
	  )
	),
官网说明链接:http://devdocs.magento.com/guides/v2.0/config-guide/redis/redis-pg-cache.html
验证配置
验证配置成功与否,最简单的就是先清空magento2网站var目录下面的 session 和cache文件夹,然后再运行网站前台,网站没出错而且这2个文件夹下面也没有生成其他的文件 就已经配置成功了。 当然,你可以安装上面给出来的官网链接里面的方法检查。
在线Magento漏洞扫描 补丁扫描
方便查看magento网站的打补丁情况和一些常见的安全设置问题。 官方推荐的网址:https://www.magereport.com 扫描如下图: 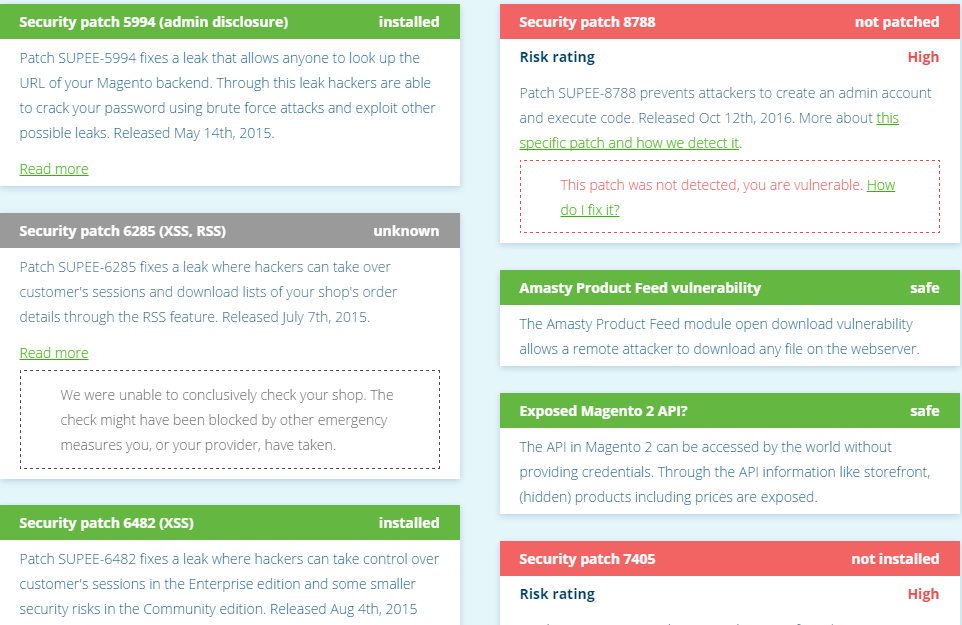 另外一个:https://magescan.com/